สอนเขียน Python เพื่อใช้ SSH ด้วย Paramiko และ Netmiko แบบรวบรัด
Write Python for SSH using Paramiko and Netmiko Quickly
— — — — — — — — — — — — — — —
สารบัญเนื้อหาทั้งหมด (My Contents)
— — — — — — — — — — — — — — —


— — — — — — — — — — — — — — — — — — — — — — — -
ฝากคอร์ส Python for Network Automation ผมด้วยครับ
— — — — — — — — — — — — — — — — — — — — — — — -
อุปกรณ์ endpoint ใด ๆ ก็ตามไม่ว่าจะเป็น router, switch, firewall, load balancer, server หรืออื่น ๆ ที่รองรับการใช้ CLI ผ่าน SSH เราสามารถใช้ Python module ทั้ง 3 ตัวนี้ในการ SSH ไปหาได้ทั้งหมด เรียงจาก low level ไปจนถึง high level ดังนี้
- Socket
- Paramiko
- Netmiko
ซึ่งที่จริงแล้วยังมี module ตัวอื่นอีก เช่น pexpect, pxssh หรือ fabric เป็นต้น
แต่สำหรับในบทความนี้ผมจะยกตัวอย่างเฉพาะ Paramiko และ Netmiko เท่านั้น เพราะเป็นที่นิยมกว่าตัวอื่น ส่วน Socket นั้นถ้าคนทั่วไปคงไม่มีใครเขียนโดยใช้มันเพื่อทำเป็น SSH script แน่นอน ฮ่า ๆ
และตัวอย่างทั้งหมดในวันนี้ผมจะเขียน Python เพื่อ SSH ไปยัง Cisco router นะครับ ซึ่งถ้าคุณจะ SSH ไปหาอุปกรณ์อะไรก็ตามนั้นไม่ต่างกันเลย สามารถทำตามได้
Code ตัวอย่าง
ใครใช้ Git ก็จัดไปตามนี้เลย
git clone https://github.com/nopnithi/python_ssh_tutorial.gitเสร็จแล้วก็ install พวก library ต่าง ๆ จากไฟล์ requirements.txt
pip3 install -r requirements.txt
Paramiko
Paramiko คือ SSH library บน Python ที่ค่อนข้างดีและยืดหยุ่นกว่า Netmiko สำหรับ SSH ไปหาอุปกรณ์ปลายทาง หรือจะใช้ transfer ไฟล์ด้วย SFTP ก็ได้
แต่ข้อเสียของ Paramiko ก็คือความยืดหยุ่นของมันนั่นแหละ เพราะทำให้เราต้องเขียน code มากขึ้นเพื่อให้ตอบโจทย์การทำงานของเรา
เช่น ในการ SSH ไปยัง Cisco router เพื่อที่จะเข้า config mode เราก็ต้องเขียน code เองว่าถ้าเจอ prompt เป็น # แสดงว่าไม่ได้อยู่ใน config mode ก็ให้ส่ง configure terminal ไปอะไรทำนองนี้
ในขณะที่ Netmiko นั้นได้เตรียมฟังก์ชั่นในการ enable หรือ exit ออกจาก config mode มาให้เสร็จสรรพพร้อมใช้ จะเป็น router หรือ switch รุ่นไหนก็ตามขอแค่ support เป็นอันใช้ได้หมด ทีนี้น่าจะเข้าใจคำว่า low level หรือ high level ที่ผมสื่อแล้วนะครับ
ฟังก์ชั่นของ Paramiko เบื้องต้น
- set_missing_host_key_policy(paramiko.AutoAddPolicy()) = เพิ่ม SSH key ไปยังไฟล์ known_hosts
- client.connect() = เริ่ม connect ไปยัง SSH server
- client.close() = ปิด SSH connection
- client.invoke_shell() = สร้าง session (มองว่าเหมือนเปิด terminal)
- session.send() = ส่ง command ผ่าน session จาก invoke_shell()
- session.recv() = รับ response จาก server ผ่าน session จาก invoke_shell()
ติดตั้ง Paramiko บน Python
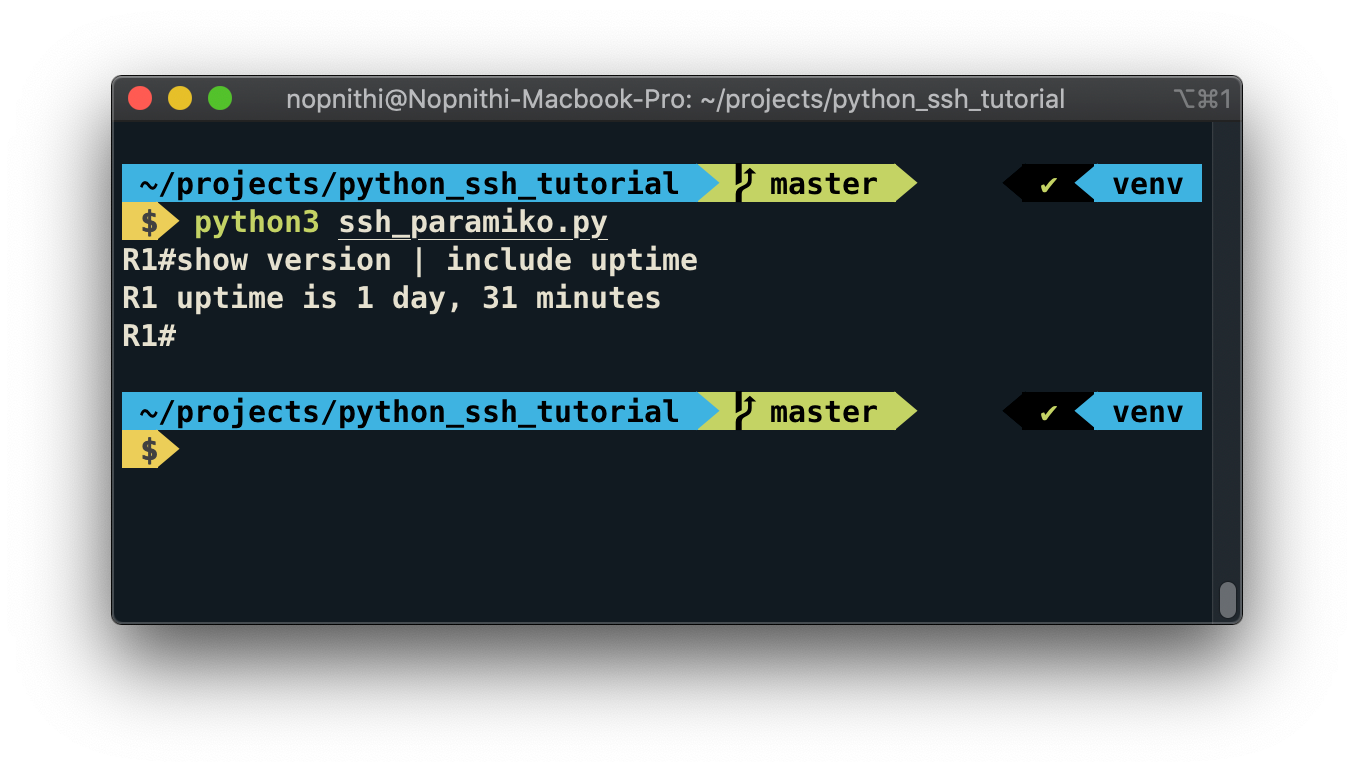
pip3 install paramikoตัวอย่าง 1: ใช้ Python ในการ SSH ด้วย Paramiko
# python_ssh_tutorial/ssh_paramiko.pyfrom paramiko import SSHClient, AutoAddPolicy
from time import sleep

with SSHClient() as client:
    client.set_missing_host_key_policy(AutoAddPolicy())
    client.connect(
        hostname='10.1.30.101',
        username='nopnithi',
        password='P@ssw0rd',
        look_for_keys=False
    )
    session = client.invoke_shell()
    session.send('show version | include uptime' + '\n')
    sleep(1)
    output = session.recv(65535).decode('utf-8')
    print(output.strip())
เมื่อรันแล้วจะได้ผลลัพธ์แบบนี้
R1#show version | include uptime
R1 uptime is 1 hour, 35 minutes
R1#
จากตัวอย่างด้านบนนี้เป็นตัวอย่างง่าย ๆ ในการใช้ Paramiko ในการ SSH ไปยัง Cisco router แล้วส่ง “show version | include uptime” ไป หลังจากส่ง command ไปโปรแกรมจะรอ 1 วินาทีแล้วรับ response data จาก server มาแสดง
ตัวอย่าง 2: ใช้ Python ในการ SSH ด้วย Paramiko (ดัก Prompt)
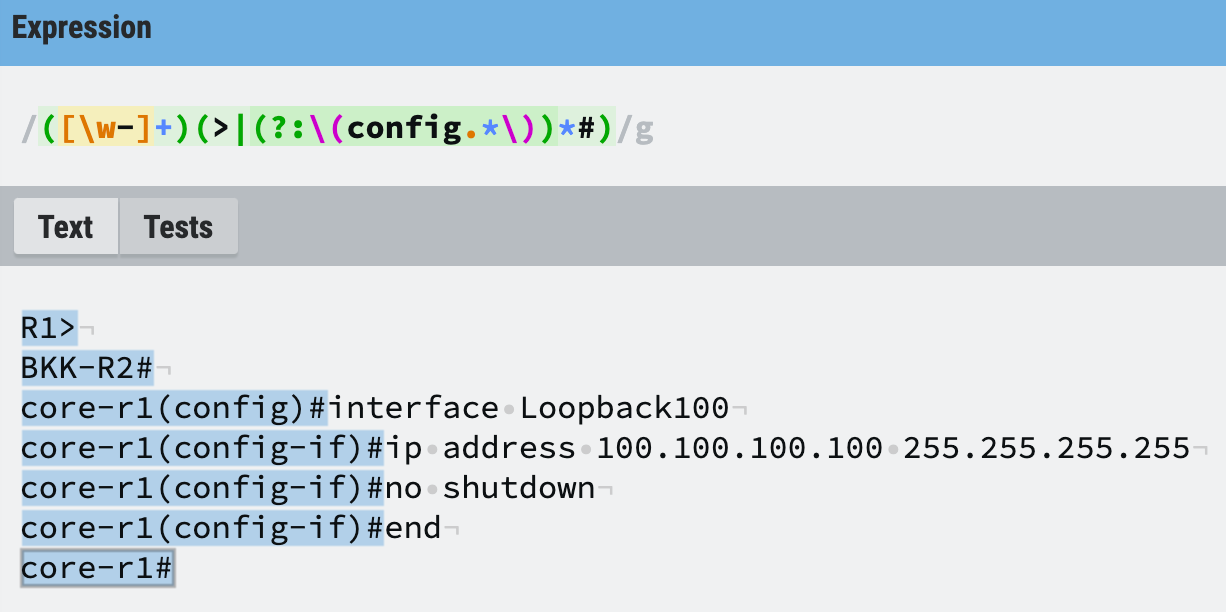
คราวนี้เป็นอีกตัวอย่างเพื่อให้เห็นถึงความ low level ของมันครับ โดยผมจะเพิ่มฟังก์ชั่นเพื่อดัก prompt ซึ่งถ้าหากไม่เจอ prompt ก็จะไม่ทำงานต่อ
def find_prompt(output):
    last_line = output.splitlines()[-1].strip()
    if match(r'([\w-]+)(>|#|\(config(?:.*)\)#)', last_line):
        return True
    return False
ฟังก์ชั่น find_prompt() จะรับค่า output ที่ได้รับมาจาก server มาเพื่อเช็คบรรทัดสุดท้ายว่าได้รับ prompt มาด้วยหรือไม่ (กรณีนี้คือ prompt ของ Cisco) เพราะถ้าหากเราได้รับ prompt มาแปลว่างานก่อนหน้าที่เราทำไปนั้นเสร็จสิ้นแล้ว ถูกต้องมั้ยครับ?
ทดสอบ Regular Expression ในการดัก Prompt ของอุปกรณ์ Cisco

นำไป implement ใน code เดิมของเราแบบนี้เลย
# python_ssh_tutorial/ssh_paramiko_prompt.pyfrom paramiko import SSHClient, AutoAddPolicy
from time import sleep
from re import match

def find_prompt(output):
    last_line = output.splitlines()[-1].strip()
    if match(r'([\w-]+)(>|(?:\(config.*\))*#)', last_line):
        return True
    return False

def main():
    output = ''
    with SSHClient() as client:
        client.set_missing_host_key_policy(AutoAddPolicy())
        client.connect(
            hostname='10.1.30.101',
            username='nopnithi',
            password='P@ssw0rd',
            look_for_keys=False
        )
        session = client.invoke_shell()
        _output = session.recv(65535).decode('utf-8').rstrip()
        output += _output
        if find_prompt(_output):
            print('Got prompt, login is successful')
            session.send('show version | include uptime' + '\n')
            sleep(1)
            _output = session.recv(65535).decode('utf-8').rstrip()
            output += _output
            if find_prompt(_output):
                print('Got prompt, sending command is successful')
                print(output.strip())

if __name__ == '__main__':
    main()
จะได้
Got prompt, login is successful
Got prompt, sending command is successful
R1#show version | include uptime
R1 uptime is 22 hours, 44 minutes
R1#
คราวนี้เราสามารถเช็ค prompt ได้ละ แต่สังเกตว่าผมยังคงใช้ time.sleep() เพื่อรอ response data หลังจากส่ง command อยู่ดี ซึ่งถ้าหากคุณเจอ show running-config ที่มีประมาณ 100,000 บรรทัดคุณจะทำยังไง รอกี่วินาทีดี? บอกเลยว่าพังครับ เพราะบางตัวอาจเจอ 50 บรรทัด บางตัวมี 100,000 บรรทัด ฮ่า ๆ
ตัวอย่าง 3: ใช้ Python ในการ SSH ด้วย Paramiko (รอรับ Data จนกว่าจะเจอ Prompt)
เริ่มจากยกส่วนของการรับ data ไปไว้ในฟังก์ชั่นก่อน เพื่อให้ reuse code ได้ง่าย
def get_output(session):
    return session.recv(65535).decode('utf-8').rstrip()
เพิ่มฟังก์ชั่น send_command() ขึ้นมา
def send_command(session, command):
    cmd_output = ''
    session.send(command + '\n')
    sleep(0.3)
    while True:
        _output = get_output(session)
        cmd_output += _output
        if find_prompt(_output):
            break
    return cmd_output
ฟังก์ชั่นนี้จะทำหน้าที่ในการส่ง command ไป หลังจากนั้นจะวนลูปเพื่อรับค่า response data จาก server ไปเรื่อย ๆ จนกว่าจะเจอ prompt แล้วก็ค่อย return ค่า command output ออกมา
นำไป implement เข้าไปในตัวอย่างก่อนหน้า
# python_ssh_tutorial/ssh_paramiko_wait_data.pyfrom paramiko import SSHClient, AutoAddPolicy
from time import sleep
from re import match

def get_output(session):
    return session.recv(65535).decode('utf-8').rstrip()

def find_prompt(output):
    last_line = output.splitlines()[-1].strip()
    if match(r'([\w-]+)(>|(?:\(config.*\))*#)', last_line):
        return True
    return False


def send_command(session, command):
    cmd_output = ''
    session.send(command + '\n')
    sleep(0.3)
    while True:
        _output = get_output(session)
        cmd_output += _output
        if find_prompt(_output):
            break
    return cmd_output

def main():
    output = ''
    with SSHClient() as client:
        client.set_missing_host_key_policy(AutoAddPolicy())
        client.connect(
            hostname='10.1.30.101',
            username='nopnithi',
            password='P@ssw0rd',
            look_for_keys=False
        )
        session = client.invoke_shell()
        _output = get_output(session)
        output += _output
        if find_prompt(_output):
            cmd_output = send_command(session, 'terminal length 0')
            output += cmd_output
            cmd_output = send_command(session, 'show running-config')
            output += cmd_output
            print(output.strip())

if __name__ == '__main__':
    main()
จะได้
R1#terminal length 0
R1#show running-config
Building configuration...

Current configuration : 3849 bytes
!
! Last configuration change at 04:46:30 UTC Sat May 30 2020 by nopnithi
!
version 15.6
service timestamps debug datetime msec
service timestamps log datetime msec
no service password-encryption
!
hostname R1
!
boot-start-marker
boot-end-marker
!
!
!
aaa new-model
...
...
คราวนี้มีทั้งดัก prompt มีทั้งรอรับ response data จาก command ยาว ๆ ก็ไม่จำเป็นต้องใช้ time.sleep() เพื่อ delay หลังส่ง command อีกต่อไป แถม flexible กว่ากันเยอะ
Netmiko
มาที่ Netmiko กันบ้าง สำหรับตัวนี้จะเน้นไปที่การ SSH ไปยังอุปกรณ์ network นะครับ แต่จะ support กับอุปกรณ์ใดบ้างก็ลองไปดูใน document ของเค้าได้เลย
ที่จริงแล้ว Netmiko เบื้องหลังมันก็ใช้ Paramiko นั่นแหละครับ แค่เพิ่มความสะดวกในการใช้งานให้เหล่า network engineer เท่านั้นเอง
ด้วยความที่มัน high level กว่า Paramiko ทำให้มันใช้ง่ายเพราะเขียน code น้อยกว่า ยกเว้นว่ามันไม่ support กับอุปกรณ์ของคุณมันก็จะกลายเป็นข้อเสียขึ้นมาทันที
ติดตั้ง Netmiko บน Python
pip3 install netmikoฟังก์ชั่นของ Netmiko เบื้องต้น
- ConnectHandler() = สร้าง object ของ connection/session
- enable() = เข้าสู่ privilege mode
- config_mode() = เข้าสู่ configuration mode
- exit_enable_mode() = ออกจาก privilege mode
- exit_config_mode() = ออกจาก configuration mode
- send_command() = ส่ง command และ return ค่า output
- send_config_set() = ส่ง command เป็น list และ return ค่า output
- disconnect() = ตัด SSH connection
ตัวอย่าง 1: ใช้ Python ในการ SSH ด้วย Netmiko
from netmiko import ConnectHandlerdevice = {
    'host': '10.1.30.101',
    'username': 'nopnithi',
    'password': 'P@ssw0rd',
    'secret': 'P@ssw0rd',
    'device_type': 'cisco_ios',
    'fast_cli': True
}
with ConnectHandler(**device) as net_connect:
    output = net_connect.send_command('show version | include uptime')
    print(output.strip())
จะได้
R1 uptime is 46 minutesสังเกตว่า output จะออกมาค่อนข้าง clean คือมีเฉพาะ output จาก command ที่ส่งไป เพราะ Netmiko มีฟังก์ชั่นในการ strip output ให้เราแล้ว
แถมเรายังสามารถใส่พารามิเตอร์ในฟังก์ชั่น send_command() เพิ่มได้เพื่อเล่นกับ output ว่าจะให้ strip หรือไม่, ให้ติด prompt มาด้วยป่าว, มี delay เท่าไร หรือสามารถกำหนด expect prompt ได้ โดยทั้งหมดนี้ถ้าเป็น Paramiko คุณต้องเขียนเองตามที่ผมได้สอนได้ข้างต้นนั่นแหละครับ ฮ่า ๆ
เลือกใช้ตัวไหนดีระหว่าง Paramiko กับ Netmiko?
ถ้าอุปกรณ์ปลายทางของเราใช้กับ Netmiko ได้ ผมแนะนำให้ใช้ Netmiko ก่อนเสมอ แต่ถ้าไม่ support ก็ให้กลับมาหา Paramiko ครับ
สรุปส่งท้ายและคำแนะนำเพิ่มเติม
แม้ตัวอย่างที่ผมให้ไปจะค่อนข้าง practical ในระดับนึงแล้ว แต่ถ้าหากมีการนำไปใช้งานจริงใน script หรือ app ของคุณกับ network หรือ system ที่มี scale ใหญ่ ผมขอแนะนำให้เพิ่มเติมเรื่องเหล่านี้
- เรื่อง Error Handling ถ้าหาก node down, network ล่ม, อุปกรณ์ไม่ได้เปิด SSH, ฯลฯ มันก็จะพังแล้วหยุดการทำงานไป ให้ไปเปิด document เพื่อดูเรื่องนี้เพิ่มเติมด้วย นั่นก็คือการใช้ try/except block มาช่วยนั่นเอง
- เรื่อง Timeout และ Retry ถ้าหาก code ที่คุณเขียนเป็นมากกว่า Python script สั้น ๆ การสร้างฟังก์ชั่น timeout สำหรับจำกัดเวลาในรอ response และการ retry เพื่อลองอีกครั้งเมื่อเกิดข้อผิดพลาดบางอย่างก็สำคัญไม่แพ้กัน
- เรื่อง Concurency ถ้าคุณเขียน Python เพื่อ SSH ไปยังอุปกรณ์ 5 หรือ 10 ตัวก็ไม่น่าจะติดอะไร แต่ถ้าเจอระดับ 50, 100, 1,000 หรือเป็น 20,000 ตัวเนี่ยไม่มีทางใช้ for loop ธรรมดาได้ครับ ดังนั้นเรื่อง concurrency อย่าง multi-threading, multiprocessing หรือ async IO ต้องมาแล้ว
- เรื่อง OOP (Object Oriented Programming) จาก code ตัวอย่างที่ผมให้ไปมัน simple มาก ผมก็เลยเขียนเป็นฟังก์ชั่นธรรมดาเพื่อให้เข้าใจได้ง่ายสำหรับคนส่วนใหญ่ แต่ในความเป็นจริงถ้า script เราเริ่มใหญ่ การเขียนเป็น class จะช่วยให้มัน clean และ maintainable มากกว่า
— — — — — — — — — — — — — — —
สารบัญเนื้อหาทั้งหมด (My Contents)

ความคิดเห็น
แสดงความคิดเห็น